Quick Support
Fasterpay Fx QuickSupport
Download and install the remote support application and a Fasterpay Fx support staff can assist with your enquiry. Compatible with most operating systems. You can find instructions for both Windows and Mac below.
For Windows:
Allow Remote Control Access
- Run Fasterpay Fx QS Double click on the’ TeamViewQS’ Application
- Accept the disclaimer Read the disclaimer and click ‘Accept’.
- Provide ID and Password Provide your ‘TeamViewer ID’ and ‘Password’ to Fasterpay Fx Support Staff every time you need help.

For Mac:
How to grant access to TeamViewer on your Mac
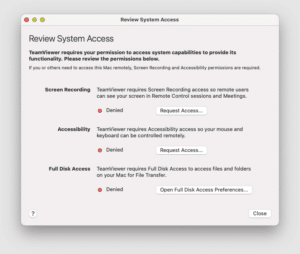
When starting TeamViewer on your Mac running for the first time, you may see the following dialog:


You can also open this dialog by clicking on Help –> Check system access.
To remote control a Mac, you will need to give permission for
- Screen Recording (1)
- Accessibility
To use file transfer, you will need to give permission for
- Full Disk Access
(1) Screen Recording permission is not needed on macOS 10.14 Mojave.
How to allow access
To allow access, click each button in the dialog. This will take you to the corresponding setting in the Security & Privacy preferences.
In this example, we will use Accessibility. Click the Request Access… button to the right of Accessibility.
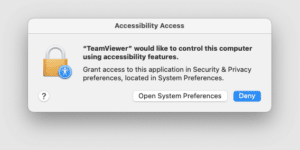
In the following dialog click Open System Preferences.

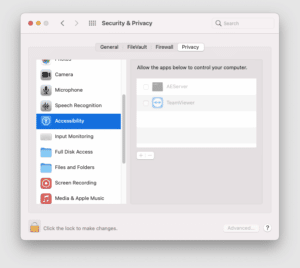
This will take you to the Accessibility section of the Security & Privacy preferences:

You may need to click the padlock icon in the lower-left corner to make changes. You might be prompted to enter an administrator account’s credentials to continue.
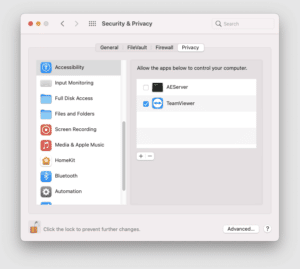
Check the box next to TeamViewer to grant access:

Note: If you see an app in the list titled TeamViewer_Desktop, make sure to check this box as well.
Go back to TeamViewer, and repeat the same process for the other permissions.
When you are done, you may click the padlock in the lower-left corner again to prevent further changes.
The next time you want to receive an incoming connection with TeamViewer, the person connecting to your Mac will be able to see and control your device.
The permission status can be reviewed under Help -> Check system access at any time.

